昨晚修改一些bash shell script的時候,發現這個工具可以用命令列的方式修改gnome裡面的一些設定,蠻方便的。因此就來稍微寫個簡介。
gconf的運作方式類似Windows上面的登錄檔,使用一個具有目錄結構的視窗來編輯一些桌面環境的偏好配置。底下以ubuntu為例,簡單介紹一下gconf的一些功能以及配置方式。
gconf的運作包含以下幾項:
gconf各項設定值所儲存的文件
gconfd-2:背景執行的deamon
gconftool-2:命令列中的設定程式
gconf-editor:圖形化的gconf設定程式
gconf的文件路徑保存於/usr/share/gconf/default.path此一檔案中,可概略分為force settings, user performances, 以及system defaults 。force settings表示這些設定使用者不能變動,user performances則代表是使用者可以變動的。而系統的預設值則存於system defaults裡面。
gconf有一個圖形化介面的編輯器,是為gconf-editor。輸入gconf-editor即可用簡單易懂的方式來修改與存取gconf設定。

從上圖可以簡單的看到,gconf裡面主要有四個資料夾:apps、desktop、schemas、system。簡單描述如下:
apps:
主要是放各種在gnome環境下運作的應用程式偏好設定,例如nautilus、evolution等等。
desktop:
desktop:
桌面環境的配置,諸如background、font_rendering、interface等等。
system:
關於系統方面的配置,裡面可以設定dns、proxy、samba等。
schemas:
主要放置其他設定值的資料文件,存取與設定方式和其他三者不同。裡面的資料夾apps、desktop、system剛好就是其他三個資料夾,其中的目錄樹也幾乎相同。schemas所儲存的值又可細分為設定鍵名稱(key name)、設定鍵擁有者(key owner)、簡短說明(short description)、詳細說明(long scription)。
schema檔案存放於/usr/share/gconf/default/裡面,以schemas結尾的就是schema的檔案。
schema檔案的內容舉例如下(以apps_nautilus_preferences.schemas為例,經過簡化):
< gconfschemafile>< schemalist>< !-- Keep the defaults in sync with the emergency fallbacksin nautilus-global-preferences.c -->< !-- General preferences -->< schema>< key> /schemas/desktop/gnome/file_views/show_hidden_files< /key>< applyto> /desktop/gnome/file_views/show_hidden_files< /applyto>< owner> nautilus< /owner>< type> bool< /type>< default> false< /default>< locale name="C">< short> Whether to show hidden files< /short>< long>If set to true, then hidden files are shown inthe file manager. Hidden files are either dotfiles or arelisted in the folder's .hidden file.< /long>< /locale>< locale name="zh_TW">< short> 是否顯示隱藏檔案< /short>< long> 如設定為‘true’,所有隱藏檔案都會在檔案總管中顯示出來。所謂隱藏檔案即是任何第一個字元為一點‘.’的檔案,或者在某個資料夾的 .hidden 檔案內容之中。< /long>< /locale>< /schema>< /schemalist>< /gconfschemafile>
< locale name="zh_TW"> 指定了當系統的預設語言($LANG環境變數)為zh_TW時應該顯示的說明。
底下這兩行則代表了schema在GConf中的所在位置,以及對應到哪個值。
< key> /schemas/desktop/gnome/file_views/show_hidden_files< /key>
< applyto> /desktop/gnome/file_views/show_hidden_files< /applyto>
如果我們用gconf-editor去檢視/desktop/gnome/file_views/show_hidden_files這個值,就可以發現以下的說明:
設定鍵說明設定鍵名稱: /desktop/gnome/file_views/show_hidden_files設定鍵擁有者: nautilus簡短說明: 是否顯示隱藏檔案詳細說明: 如設定為‘true’,所有隱藏檔案都會在檔案總管中顯示出來。所謂隱藏檔案即是任何第一個字元為一點‘.’的檔案,或者在某個資料夾的 .hidden 檔案內容之中。
剛好可以對應到我們剛才在schema檔案裡面的設定。
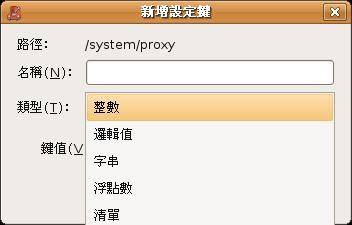
如果要新增設定鍵的話,在空白處按下右鍵選新增:

關於鍵值的設定,有分為整數(int)、邏輯值(bool)、字串(string)、浮點數(float)、以及清單(list)。若新增的為清單,則內容均需固定為整數、字串、邏輯值、浮點數的一種。
目前視窗化的gconf-editor中仍未找到新增資料夾(directory)的功能。
再來介紹文字化的編輯工具gconftool-2。gconftool-2可以在命令列環境中配置桌面環境,並且可以用於shell script中進行快速大量配置。
gconftool-2 [-?] [-?|--help] [--usage] [-s|--set] [-g|--get][--set-schema] [-u|--unset] [--recursive-unset] [-a|--all-entries][--all-dirs] [--dump] [--load=STRING] [--unload=STRING][-R|--recursive-list] [--dir-exists=STRING] [--shutdown] [-p|--ping][--spawn] [-t|--type int|bool|float|string|list|pair] [-T|--get-type][--get-list-size] [--get-list-element][--list-type=int|bool|float|string] [--car-type=int|bool|float|string][--cdr-type=int|bool|float|string] [--short-desc=描述] [--long-desc=描述][--owner=擁有者] [--install-schema-file=檔名] [--config-source=來源][--direct] [--makefile-install-rule] [--makefile-uninstall-rule][--break-key] [--break-directory] [--short-docs] [--long-docs][--get-schema-name] [--apply-schema] [--unapply-schema][--ignore-schema-defaults] [--get-default-source] [-v|--version]
底下列出一些常用的命令參數
-s, --set 設定特定key的value並且同步之。需與 --type 一起使用。
-t, --type=int|bool|float|string|list|pair 設定所欲存取的value type
-g, --get 顯示特定key的value。
-u, --unset 將鍵值還原為預設值(system defaults)。
-a, --all-entries 印出該目錄中所有鍵值。
--all-dirs 列出目錄中的子目錄
-R, --recursive-list 遞迴列出目錄中的所有項目
--dir-exists=STRING 測試目錄是否存在。0為存在目錄,2為不存在。
--set-schema 設置 schema 的屬性,與 --short-desc(簡短說明), --long-desc(詳細說明), --owner(設定鍵擁有者), 和 --type 同時使用。
--makefile-install-rule 從GCONF_CONFIG_SOURCE這個環境變數所指定的路徑中安裝 schema 文件到 GConf 中。
--makefile-uninstall-rule 從GCONF_CONFIG_SOURCE這個環境變數所指定的路徑中移除schema 文件。
--direct 直接寫入到資料庫中,必須在gconfd這個服務沒有啟用的時候才能執行。
--dump 將資料庫內容一次列出來
舉例來說,如果要設定連線均使用位址為wwwproxy.xyz.com:3128的proxy,可以輸入
$ gconftool-2 --type=bool --set /system/gnome-vfs/use-http-proxy "TRUE"$ gconftool-2 --type=string --set /system/gnome-vfs/http-proxy-host "wwwproxy.xyz.com"$ gconftool-2 --type=int --set /system/gnome-vfs/http-proxy-port "3128"$ gconftool-2 --type=string --set /system/proxy/mode "manual"$ gconftool-2 --type=bool --set /system/http_proxy/use_same_proxy "TRUE"$ gconftool-2 --type=bool --set /system/http_proxy/use_http_proxy "TRUE"$ gconftool-2 --type=string --set /system/http_proxy/host "wwwproxy.xyz.com"$ gconftool-2 --type=int --set /system/http_proxy/port "3128"
若是將
$ gconftool-2 --type=string --set /system/http_proxy/host "wwwproxy.xyz.com"
改為
# gconftool-2 --direct --config-source xml:readwrite:/etc/gconf/gconf.xml.mandatory --type=string --set /system/http_proxy/host "wwwproxy.xyz.com"
則是代表將這個值設定為強制(force settings)並寫入到/etc/gconf/gconf.xml.mandatory這個設定檔中。
針對schema的操作又不大相同了。
在前面說過,schema檔案存放於/usr/share/gconf/default/裡面,以schemas結尾的就是schema的檔案。而schema檔案裡面已經寫好匯入的gconf目錄,因此無須特別指定。
如果想要從特定檔案目錄匯入,例如家目錄中的.gconf資料夾匯入Test.schemas,則執行
$ export GCONF_CONFIG_SOURCE="xml:readwrite:$HOME/.gconf"$ gconftool-2 --makefile-install-rule Test.schemas
如果要自己設定,則執行
$ gconftool-2 --set-schema /schemas/apps/kiba/launchers/file --long-desc "這邊輸入詳細描述" --short-desc "這邊輸入簡短描述"$ gconftool-2 --apply-schema /schemas/apps/kiba/launchers/file /apps/kiba/launchers/file
另外還有一個gconf-schemas的執行檔,可以對schema檔案做註冊或移除註冊的動作,不過實做方式目前仍不清楚。
gconf-schemas --[un]register file1.schemas [file2.schemas [...]]
參考資料


0 意見:
張貼留言